(Note: This page includes links to products I recommend for a more reliable Zoom setup. If you click and purchase an item, as an Amazon Associate I earn from qualifying purchases).
Recommended Setup
Headphones – Use wired headphones to avoid problems. Sony MDR-7506 headphones work very well. They are comfortable, have good sound and fairly reasonably priced. Avoid bluetooth headphones as they have latency and will have a slight delay.
Audio Interface – Use an audio interface for vastly better sound quality so the instructor is able to hear your guitar clearly without the guitar and audio cutting in and out.
A 2 channel audio interface like a Focusrite Scarlett 2i2 will allow you to plug in your guitar directly with a cable in one channel and plug in a vocal microphone (like a Shure SM57 or SM58) into the second channel. A relatively inexpensive interface is the M-Audio M-Track Duo. Other options include the Universal Audio Volt 2, PreSonus Studio 26c, Motu m2, MOTU UltraLite-mk5, and the UAD Twins X DUO.
Another relatively inexpensive option (but not as optimal) would be to use a desktop Blue Yeti USB microphone for a basic setup to pick up your voice and acoustic guitar simultaneously through the mic along with wired headphones.
More complex setups with that require multiple inputs simultaneously – for instance – a guitar, a piano in stereo, multiple vocal mics, etc you may want to go with an 8 channel audio interface such as the UAD Apollo x8p
Wired Internet – Use a wired ethernet connection to your router rather than wireless to avoid audio dropouts and provide a more reliable experience. If your computer doesn’t have a built in ethernet jack you can purchase a USB to ethernet adapter. Anker USB to Ethernet adapter would be a solution if your computer only had USB A ports. If your computer only has USB C ports, you could use something like the Anker USB C to Ethernet adapter. If you needed to purchase an ethernet cable – something like Ugreen 10 Ft ethernet Cable should work.
Connect the USB port to your computer or device and an ethernet cable to the adapter. Connect the other end of the ethernet cable to your router.
Once you have a wired ethernet connection, turn off wi-fi to make sure your Zoom session goes through the wire rather than connecting wirelessly.
Original Sound for Musicians Setting – The most popular problem music students have is forgetting to configure AND turn on ‘Original Sound for Musicians’ in Zoom during a lesson. You MUST do this properly or the instructor will have problems hearing you. (See more detail below in Zoom how to set this up or check the YouTube video). Once configured properly, you still will need to click the on ‘Enable Original Sound for Musicians’ every time to log into Zoom.
Extra Monitor (Optional) – Connecting an extra monitor (if your computer or laptop supports it), can be very useful to see a full screen video on monitor of the instructor and yourself and a full worksheet on the another monitor or screen. Zoom supports ‘dual monitor’ mode – in Zoom > Preferences > General > Check the ‘Use dual monitors’ box. (Restart Zoom after checking this box for dual monitor support to take effect).
Adjustable Webcam (Optional) – In order for the instructor to see you and your guitar simultaneously you may need to purchase an additional camera. A Logitech Brio is a good higher end option as this has 3 different viewing angles and can give wider to close up views.
Update your Zoom Desktop client Software
Zoom very frequently updates their desktop client software and has been improving the audio capabilities to handle more professional sound for people playing instruments. Update your Zoom software so you have these newer options to handle audio better:
Instruction for Updating Zoom Software on a Apple Macintosh Computer
- Update your Zoom software application to the most recent version.
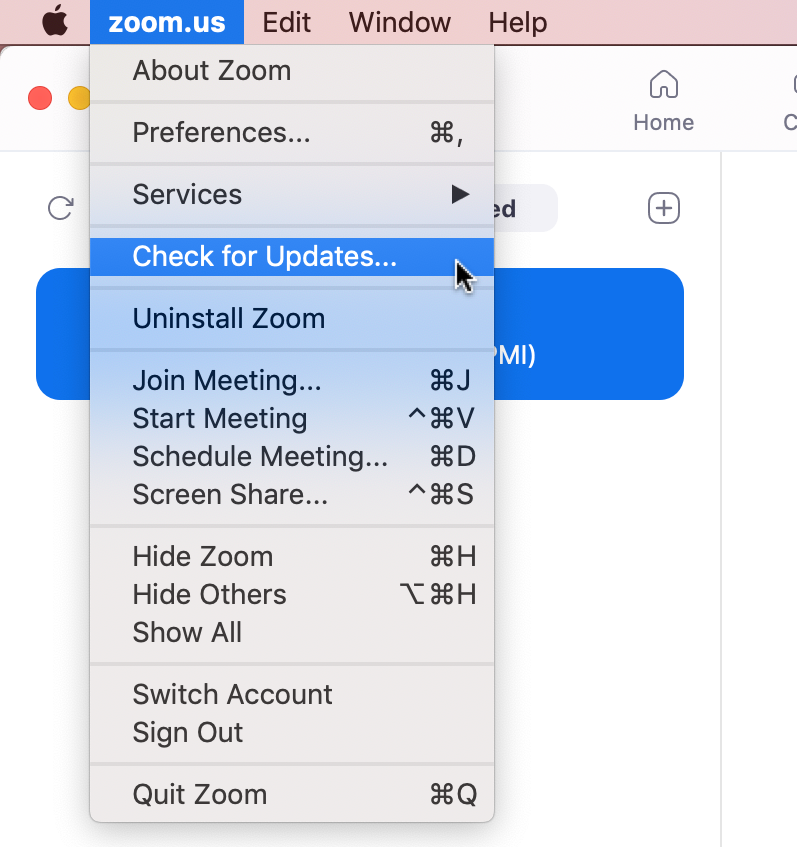
- Launch Zoom, then from menu bar select Zoom.US and select Check for Updates.
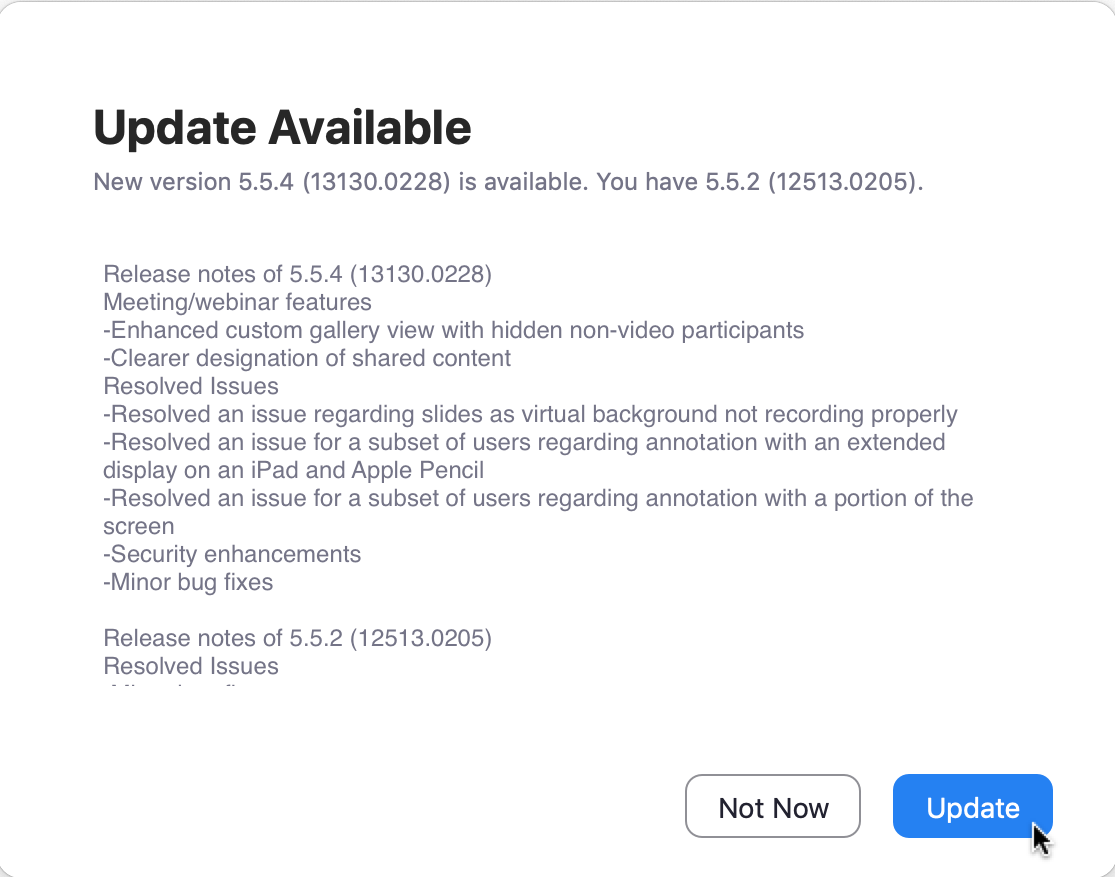
- If there is a Zoom Update Available click on the Update button.
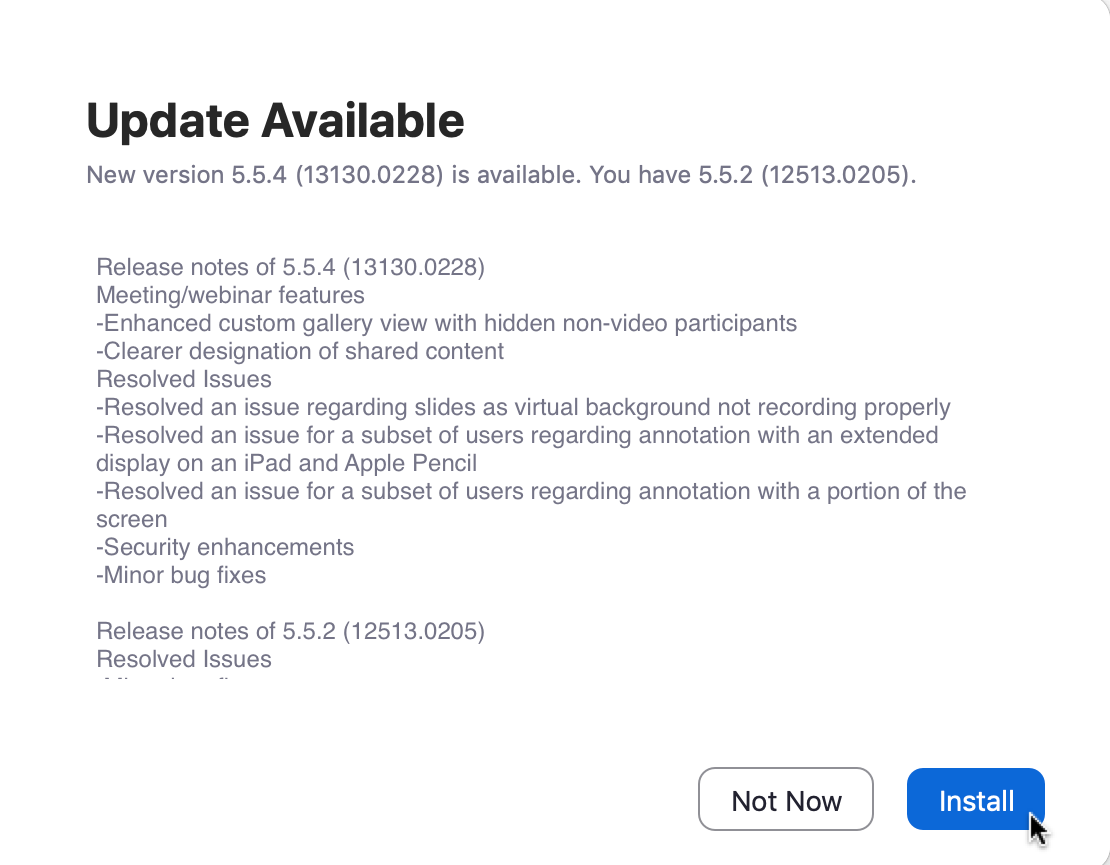
- Click the Install button after it has downloaded.
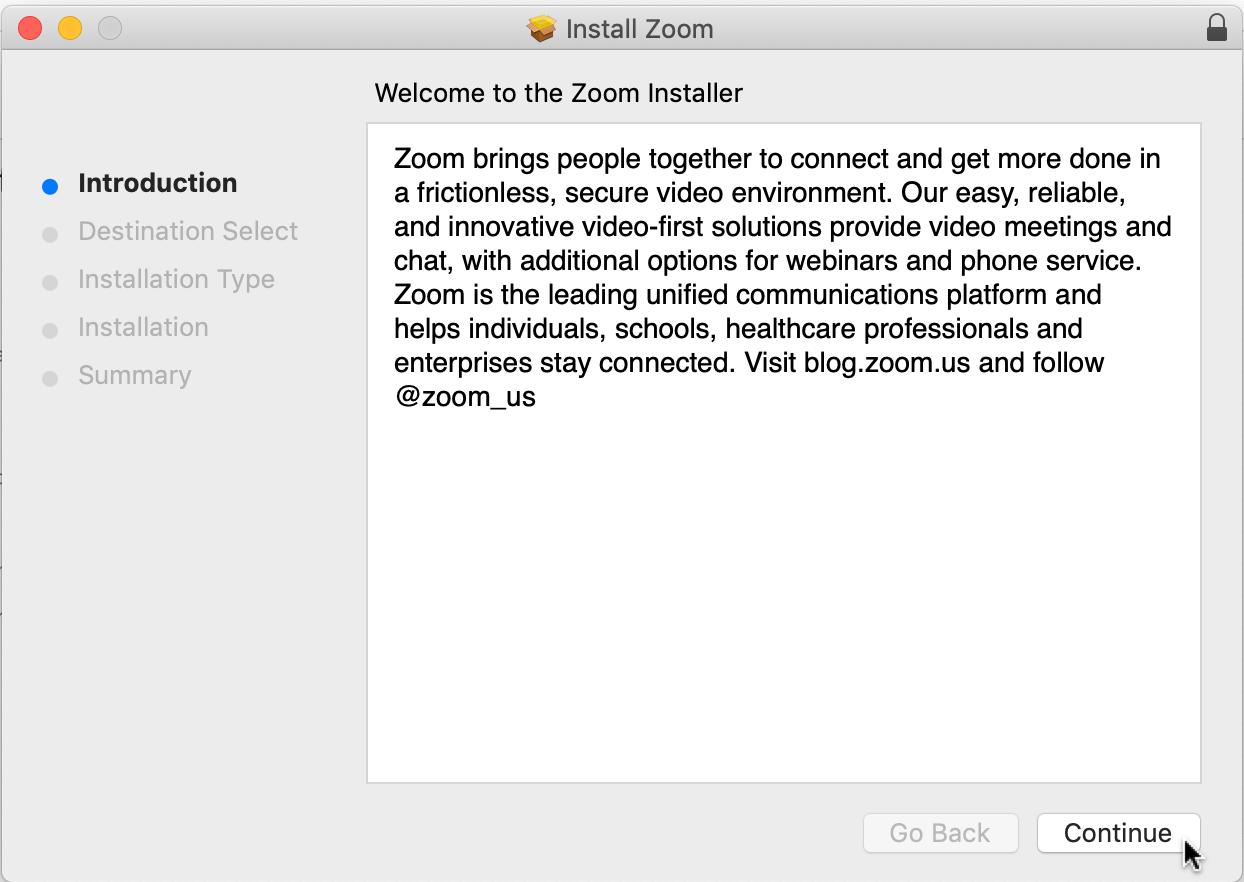
- Click Continue and follow the instructions to Install the updated version.
- Launch Zoom, then from menu bar select Zoom.US and select Check for Updates.
- Configure Zoom’s Preferences:
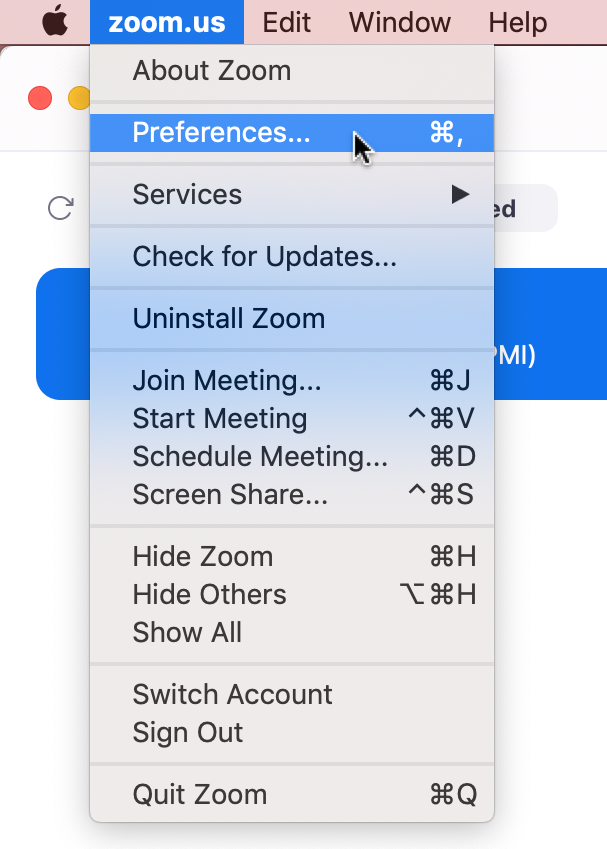
- Launch the Zoom app, from the menu bar select Zoom.US, then select Preferences.
- Select Audio
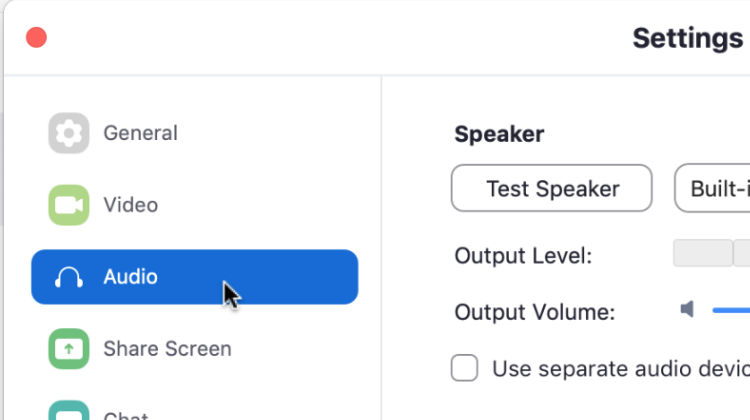
- Under Speaker, on the right side select the device that headphones are plugged into.

(In this example, my headphones are connected to my Universal Audio Thunderbolt device – your system most likely will be different) If you need to change the device, click the small down arrow located on the button on right hand side and select your device from the drop down menu. (If you have the late Jan 2023 Zoom client installed, you now have the option to choose the channels of the audio interface you want to use). - Under Microphone make sure your microphone or audio interface is selected.
(In this example, my Universal Audio interface is selected. You should select your audio device if it is not automatically selected by clicking the small down arrow on the right and choosing your microphone or audio interface).
- Uncheck the box next to Automatically adjust microphone volume.

- Manually move the Input Volume slider about 3/4 of the way to the right. (Later you can fine tune this slider when you test the volume with your mic or audio interface).
- Uncheck the box next to Automatically adjust microphone volume.
- Launch the Zoom app, from the menu bar select Zoom.US, then select Preferences.
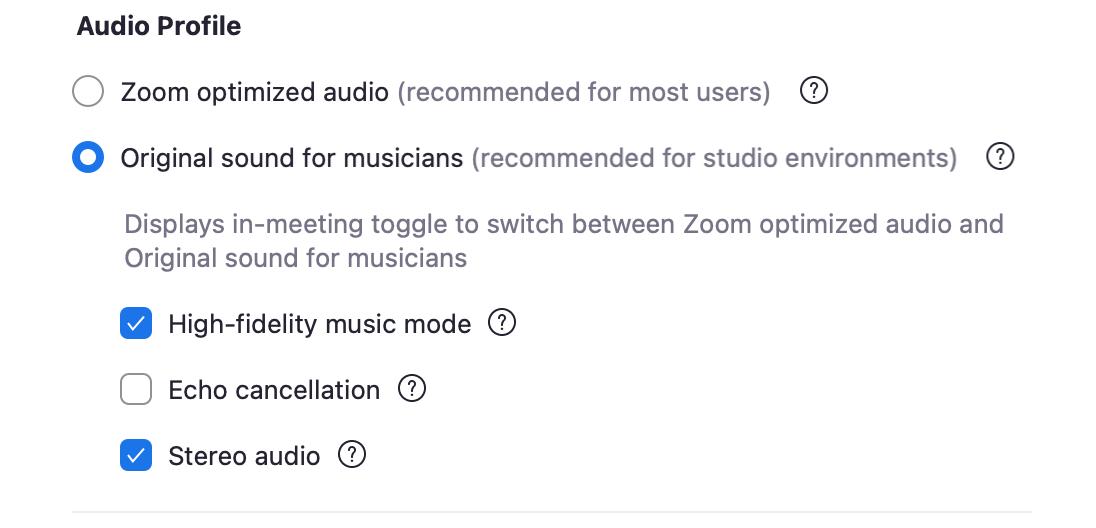
- Under Audio Profile, do the following:
- Check the box next to Original sound for musicians (recommended for studio environments. (This option automatically disables Zoom noise suppression, removes high pass filtering, and removes automatic gain control. It is recommended for playing music and studio-like environments with higher quality microphones, speakers or audio interfaces. It is not recommended for use in noisy environments or for general meetings use).
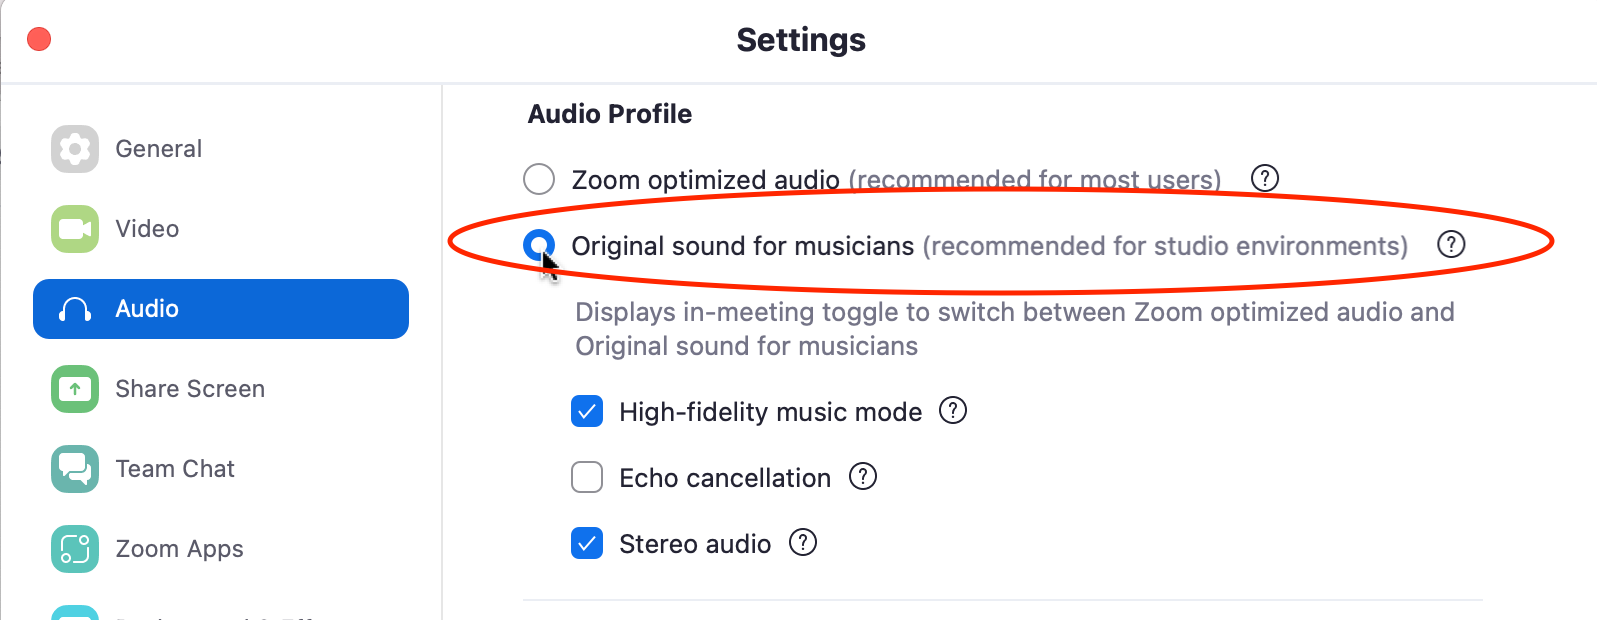
- Check the box next to High-fidelity music mode.
- Uncheck the box next to Echo cancellation.
- Check the box next to Stereo audio.
- Test your Input Level and set it optimally:
- Under Microphone, Click the Test Mic button then speak into your microphone or play your guitar. (The Input Level LED meters should light up and move).
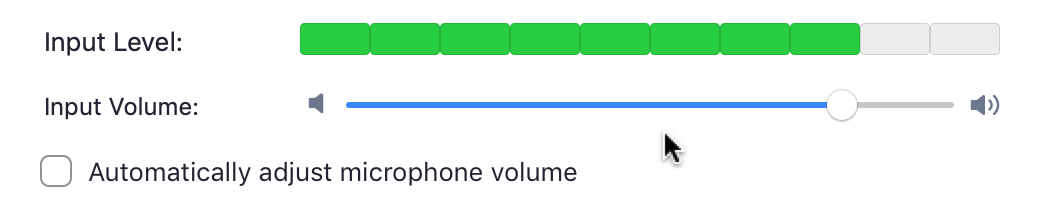
- Continue speaking or playing your guitar. Manually move the Input Volume slider in the Audio settings in Zoom so the signal coming in is not too soft or too loud. Adjust the slider so the LED lights are mainly in the green and a little in the yellow. (If the LED is in the red, it means the input signal is too strong and will clip and cause distortion. If that is the case, lower the Input slider so the LED lights don’t go into the red). If you are using an external microphone such as a Blue Yeti USB mic, adjust the physical Gain control knob on the microphone to increase the input level of the microphone.
- Under Microphone, Click the Test Mic button then speak into your microphone or play your guitar. (The Input Level LED meters should light up and move).
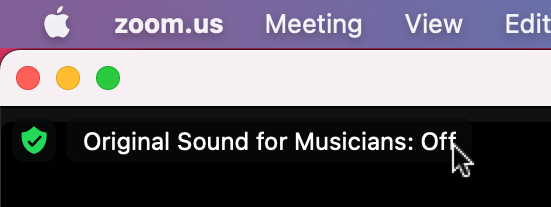
- After you connect to your meeting with Zoom, in the top left corner you should see an option that says Original Sound for Musicians: OFF. Click on the lettering to turn it on. (this will activate hi-fidelity mode).

- You should now be all set for your lesson. During your lesson, you can always open up the Audio settings and adjust the input level if your guitar or mic is too loud or soft.
- Check the box next to Original sound for musicians (recommended for studio environments. (This option automatically disables Zoom noise suppression, removes high pass filtering, and removes automatic gain control. It is recommended for playing music and studio-like environments with higher quality microphones, speakers or audio interfaces. It is not recommended for use in noisy environments or for general meetings use).
Tips
Check your Audio settings in Zoom before every guitar lesson and verify that your headphones and microphone or audio interface is still selected and set up correctly. You will need to manually remember and select the appropriate input channels every time you begin a new Zoom session).
Make sure you turn Original Sound for Musicians to On if you are using an audio interface otherwise your guitar sound will cut in and out.
On a Macintosh computer you can quickly open up the Preferences pane in Zoom by using the shortcut key: command + ,
Advanced Setup with an Audio Interface of more than 2 Channels (Mac)
Setup is more complex if you need to use additional channels (other than channel 1 & 2) of your Audio Interface with Zoom. For instance, if you have an 8 channel audio interface and your vocal microphone plugged into channel 3 and guitar in channel 5, you may need to purchase additional software.
Rogue Amoeba makes software called Loopback for the Mac can solve most of these issues and route all your instruments and voices in stereo. Loopback also allows you to use different audio sources and programs such as Logic Pro, MainStage, Music (formerly called iTunes), Capo, Guitar Pro, etc and route them together into channels 1 & 2.
You may also need Loopback to route Zoom’s output (the audio of the person or people you are connected to) into the Zoom’s ‘Speaker’ Audio setting if you are having problems hearing the output from Zoom via your audio interface
Next, within Zoom’s Audio settings configuration, select the Loopback profile you created for your Zoom’s Audio Settings Input. For the output (speakers) in Zoom, you can typically select the name of your audio interface. For instance if you had a Universal Audio interface, you can select that. Click the test button and test if you can hear sound. If not, try the other options, if you are using Loopback, try using the Loopback pass thru option.
Instructions for Microsoft Windows based PC
Follow the Zoom Audio Testing Support for testing and setting up your system.
Verify that you can hear your own audio (though your headphones or speakers) and your microphone input before your guitar lesson session. (Talk into your microphone with your headphones on and listen if you can hear yourself in the headphones).
If you can not hear yourself, open the Zoom desktop application (not the Zoom web app).
With the Zoom desktop app open, click the gear icon at the upper right corner to access the Settings menu. (If you don’t see a gear icon, click on your Profile picture, then click Settings from the pop down menu)
Navigate to the Audio tab.
Look at the devices listed under Speaker and Microphone. Make sure the correct devices are listed next to both the Test Speaker button and the Test Mic button.
Note that next to the Test Speaker button there is a selectable drop down menu to choose the correct output.
Click the Test Speaker button and listen if you can hear anything. If you can not hear anything, you have the wrong option selected. If that is the case, select the appropriate device from the drop down menu directly to the right of the Test Speaker button. After selecting a new device, click the Test Speaker button until you hear something your headphones.
Under Music and Professional Audio section:
- Check the box next to Show in-meeting option to “Turn on Original Sound”
- Check the box next to Hi fidelity music mode
- Uncheck the box next to Echo cancellation.
If still having issues with your audio, check:
How to Fix no Sound on Zoom PC
How to Fix Zoom Audio Problems
Changing settings in the desktop client/mobile app
Other Links & Articles Relating to Audio Setup
Zoom with Blue Yeti Setup
Audio – Zoom Official Help Center
Choosing the Best Gear for Online Music Lessons
How to set up your Focusrite audio interface with Zoom on Windows
How to set up your Focusrite audio interface with Zoom on a Mac